Bringing Photographers Closer to Their Natural World
|
|
|
We will update galleries as people submit and time permits. Please do not wait until the last moment to send your gallery images - the earlier they arrive, the better. However, the guidelines below must be used.
Guidelines for Submission of Participant Gallery Images: 1. All images should be scanned images or digital captures (we are sorry but we do not have the time to scan originals for everyone). If you do not have a scanner, most custom photo labs (including our sponsor, Image Craft, in Phoenix, who can do these via the mail if you cannot find a place close to home) will do raw scans of 35 mm slides/or negatives for less than $5.00 each. They will not be the highest quality scans you can buy, but they do not have to be. Scans for the Internet are generally quite small and only look good when posted to the Internet. Although we will not manipulate any scans we receive, we will adjust the curves in most, which will make those raw scans look significantly better while maintaining the integrity of the original. 2. You can send us a CD via regular mail to Roger Devore, The Nature Workshops, 7 Ryan Circle. Lebanon, IL 62254-1948, or you can attach images to an email (please attach them to the email, do not include within the body of the email) and send it to Rdfoto@aol.com. Please send them as JPEGs with the longest side measuring 600 pixels, not more, and at 72 dpi - it will take too long to download or change if they are larger than 600 pixels at 72 dpi. See comments below regarding how to resize images within Photoshop - the images need to come to us in the proper size. In emails, they can be combined so that up to four can be sent in one email (as long as your browser will handle that large of an email - if not, just send them one per email and send numerous emails). Please send about ten images, so we have extras to choose from. If you have a high speed connection to the Internet, this should work; if you have a dial-up connection, you will likely have to send more emails with fewer images per email. If you send your images by regular mail, please do not send return packages or request the return of the CD - CDs are now cheaper than the mailing of the CD; just make a copy for yourself instead. 3. Images that are added to the web galleries will have to pass certain minimum quality levels, as determined solely by us. Please adjust the Levels and Color of the images you send before sending. Additionally, we will not post any wildlife images that we believe were made without regard to the health or safety of the subject. If you send us images of captive wildlife (i.e., game farms or zoos), please disclose that - we will still use the images with the disclosure. 4. We have recently changed the way we are posting updates to the gallery pages, as you may have noticed. We are trying a new format with reasonably large thumbnails that link to larger images (thus, the 600 pixels size requested). Additionally, we would like to post a link to your personal or business web site, if you want, along with any small bio materials you might like included on your gallery page. Thus, please send us that information, too, if you want it included. 5. Please send only the images - i.e., please do not put the image on a background or canvas, or add any borders. Also, it would be very helpful if the images had real names (instead of numbers as their names), and the names need to be made up entirely of letters, not any typing characters (things like #, &, etc., do not work in our programs). All images should also have names that are words -- please no numbers as are common for labeling digital files; they will have to be changed on our end, and it would be much easier for you to change your few on your end than for us to make the changes to hundreds. 6. If a particular gallery is not updated at least once per year, it will be removed. If an update is subsequently received, a new gallery will be initiated for that individual. We look forward to seeing some beautiful images in the upcoming galleries.
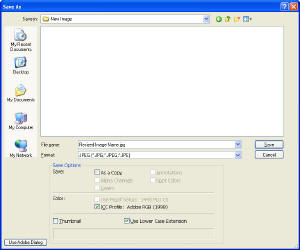
Guidelines for Changing Formats and Resizing Images From the widely varying formats and sizes that we receive for the contest and for the Participant Galleries, it appears that many out there are not sure how to change the formats or sizes of their images. Thus, we are going to try to put a step-by-step procedure below. Changing any format to JPEG: 1. Open the image in Photoshop, by clicking the File menu and Open, then locating the image and double clicking on it (or click on it once and click the open button on the pop up window that you are in). 2. Click the File menu, click on Save As to open the Save As window. 3. In the Save As window that is open, under the File Name box, is another box titled Format that is actually a drop down list. 4. Click on the down arrow on the right side of the drop down list box and you will see a list of lots of image formats. One of those is JPEG (note that JPEG only works with 8 bit images). 5. Click on the JPEG within the drop down list, then click on the Save button in the Save As window in which you are working. You will then get a new window for JPEG Options, with an area in the window entitled Image Options. On that drop down list, click maximum.
6. Photoshop will then convert the image to a JPEG format and save it as such.
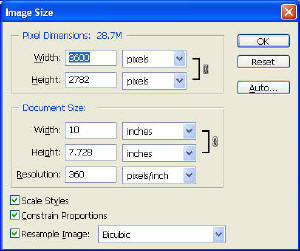
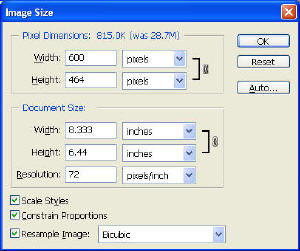
The saved image, however, will have the same dimensions and resolution as the original image, so we now need to resize it: 1. Click on the Image menu at the top of the Photoshop page, then click on Image Size to open the Image Size window.
2. There are three boxes at the bottom called Scale Styles, Constrain Proportions and Resample Image. All three boxes should normally be checked and the drop down list behind the Resample Image should be set to Bicubic (this is a Photoshop built in method of resampling that many believe is superior or at least equal to Genuine Fractals -- in any case, it is generally very good). 3. Uncheck the box for Resample Image (you will notice that the Scale Styles and Constrain Proportions boxes and lines will go darker when you do this). Change the resolution line to 100 or 72, more appropriate resolutions for JPEG images. The second box on the Resolution line should already be set to pixels/inch before you change the number. 4. Recheck the Resample Image box. 5. In the top area, called Pixel Dimensions, you want to set the drop down lists related to units of measure to Pixels. Then, change either the width to 600 or the height to 500 for our purposes (obviously you can change these to any number when resizing for your own purposes). Whichever dimension you do not change, either width or height, will automatically change to the correct size because you have the Constrain Proportions box checked and Photoshop will take care of that part. If you start changing dimensions without constraining proportions, you will start stretching or flattening the look of the image (this can actually be kind of fun to play around with sometimes). 6. You will note that at the top of the Pixel Dimensions area is a set of numbers. The first number is the file size of the image resized and the number in parenthesis is the original file size of the image in MB (or some similar measurement). It will be obvious how much smaller the new file size is.
7. Press the OK button in the Image Size window and Photoshop will resize the image. 8. You can either Save or Save As to keep the image once resized. Please rename the image with letters/words only - not with other characters, blanks or all numbers (they do not work within our web site building program) and please keep the names short (i.e., we don't need 08102005image132GoldenPondbyAudreyHeimlichmeister; something with 8-10 letters would be better). The resultant image will be good for emailing or posting to a web site. We would suggest you consider saving this section of the newsletter until you become familiar with doing this.
|
|
To register online on a secure registration
form, or to print out a
registration form, go to
Registration, |